Kendo Grid Batch Mode Page Submit
Kendo grid by Telerik tracks its rows changes in two modes:
individually or in batch. In this article I will show the batch. In batch you perform CRUD operations
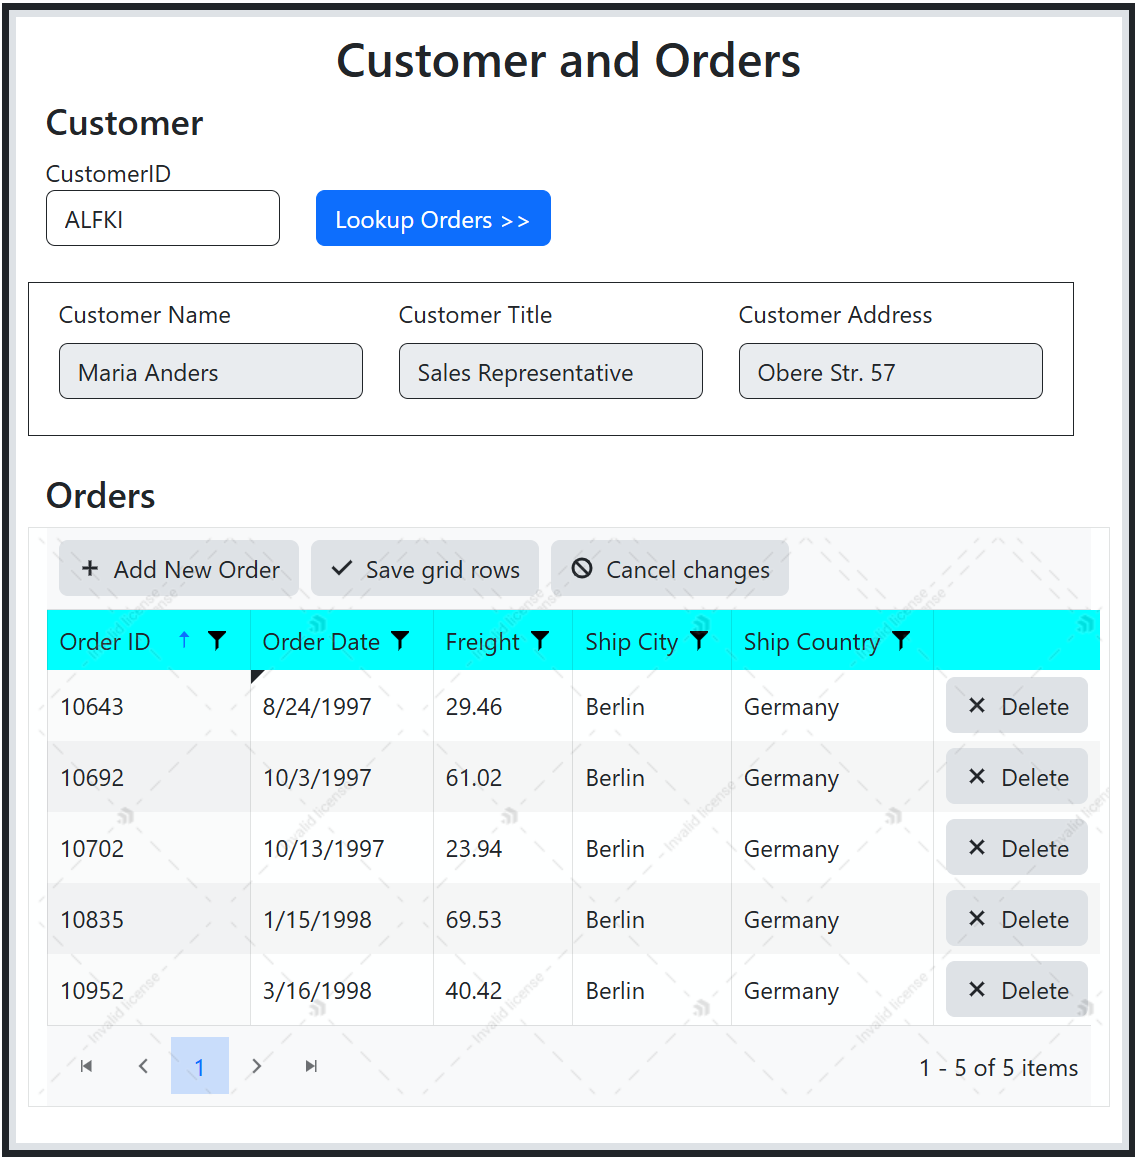
on multiple rows and commit the changes to the database in one submit. Below is a typical Customers Orders
view where we first lookup customer orders by customer ID, and the orders for the customer are populated in the grid. Then user can
create/update/delete multiple orders and commit those changes by pressing the grid's own "Save" button: 
To put the grid in batch mode, it needs to have the following in its markup:
- Batch property set to true: Batch(true)
- GridEditMode property set to InCell mode (as opposed to InLine mode): GridEditMode.InCell
- Create the CRUD handlers (Read, Update, Create, Destroy)
- Show the "Add new record" button
- Show the "Save changes" button
Here is the markup for the grid with the above settings in highlight:
1 2 3 4 5 6 7 8 9 10 11 12 13 14 15 16 17 18 19 20 21 22 23 24 25 26 27 28 29 30 31 32 33 34 35 36 | @(Html.Kendo().Grid<Order>().Name("grid") .Columns(col => { col.Bound(o => o.OrderID).Width(100); col.Bound(o => o.OrderDate).EditorTemplateName("Date").Format("{0:d}").Width(100); col.Bound(o => o.Freight).Width(20); col.Bound(o => o.ShipCity).Width(100); col.Bound(o => o.ShipCountry).Width(100); col.Command(command => { command.Destroy(); // Show Delete button } ); } ) .Editable(editable => editable.Mode(GridEditMode.InCell)) // Edit in Cell .ToolBar(tools => { tools.Create(); // "Add new record" button tools.Save(); // "Save changes" button } ) .Pageable().Sortable().Filterable() .DataSource(source => source.Ajax().Model(model => { model.Id(o => o.OrderID); model.Field(o => o.OrderID).Editable(false); // Order Id is read-only } ) .Read(read => read.Action("Read_Orders", "Home", new { customerId = Model.CustomerID })) .Update(update => update.Action("Update_Orders", "Home", new { customerId = Model.CustomerID })) .Create(create => create.Action("Create_Orders", "Home", new { customerId = Model.CustomerID })) .Destroy(destroy => destroy.Action("Delete_Orders", "Home")) .Batch(true) // If you don't set it to true, the list of rows passed into the Update/Create/Update handlers would be null )) |
On the controller side, we provide the handlers. Here's the Read handler that gets called when a user types in a Customer Id and clicks the Lookup Orders button. This handler gets also called when the grid refreshs after an add/delete/update operation:
// Read handler. Fired when grid needs to fetch rows
public ActionResult Read_Orders([DataSourceRequest] DataSourceRequest request, string customerId)
{
  using (NorthwindEntities _database = new NorthwindEntities())
  {
    var orders = _database.Orders.Where(o => o.CustomerID == customerId).ToList();

    return Json(orders.ToDataSourceResult(request, e => new Order
    {
      OrderID = e.OrderID,
      OrderDate = e.OrderDate,
      Freight = e.Freight,
      ShipCity = e.ShipCity,
      ShipCountry = e.ShipCountry,
    }), JsonRequestBehavior.AllowGet);
  }
}
This is the Create handler that gets called when user adds new orders with the "Add new record":
// Create handler
public ActionResult Create_Orders([DataSourceRequest] DataSourceRequest request,
                                  [Bind(Prefix = "models")] IEnumerable orders, string customerId)
{
    if (orders != null && ModelState.IsValid)
    {
        orders.ToList().ForEach(o =>
        {
            var order = new Order
            {
                CustomerID = customerId, // must set parent Id
                OrderDate = o.OrderDate,
                Freight = o.Freight,
                ShipCity = o.ShipCity,
                ShipCountry = o.ShipCountry
            };

            _database.Orders.Add(order);
        });

        _database.SaveChanges();
    }

    return Json(orders.ToDataSourceResult(request, ModelState));
}
This is the Update handler that gets called when user makes changes to a grid row then presses the "Save changes" button:
// Update handler
public ActionResult Update_Orders([DataSourceRequest] DataSourceRequest request,
                                  [Bind(Prefix = "models")] IEnumerable orders)
{
    if (orders != null && ModelState.IsValid)
    {
        foreach (OrderViewModel order in orders)
        {
            var target = _database.Orders.FirstOrDefault(o => o.OrderID == order.OrderID);
            if (target != null)
            {
                target.CustomerID = order.CustomerID; // must set parent id
                target.OrderDate = order.OrderDate;
                target.Freight = order.Freight;
                target.ShipCity = order.ShipCity;
                target.ShipCountry = order.ShipCountry;

                _database.Orders.Attach(target);
                _database.Entry(target).State = EntityState.Modified;
            }
        }

        _database.SaveChanges();
    }

    return Json(ModelState.ToDataSourceResult());
}
Finally we have the delete handler:
// Delete handler
public ActionResult Delete_Orders([DataSourceRequest] DataSourceRequest request,
                                  [Bind(Prefix = "models")] IEnumerable ordersToDelete)
{
    if (ordersToDelete != null)
    {

        ordersToDelete.ToList().ForEach(d =>
            {
                var orderToDelete = _database.Orders.AsQueryable().FirstOrDefault(f => f.OrderID == d.OrderID);
                _database.Entry(orderToDelete).State = EntityState.Deleted;
            });

            _database.SaveChanges();

    }

    return Json(ModelState.ToDataSourceResult());
}
Keep in mind the above handlers aren't executed until the "Save changes" button is pressed; that's the objective of batch committing the changes to the database. The handlers execute asynchronously; you will observe that if you step through them in the debugger.
Let's briefly run this thing. We start with this customer/orders view:
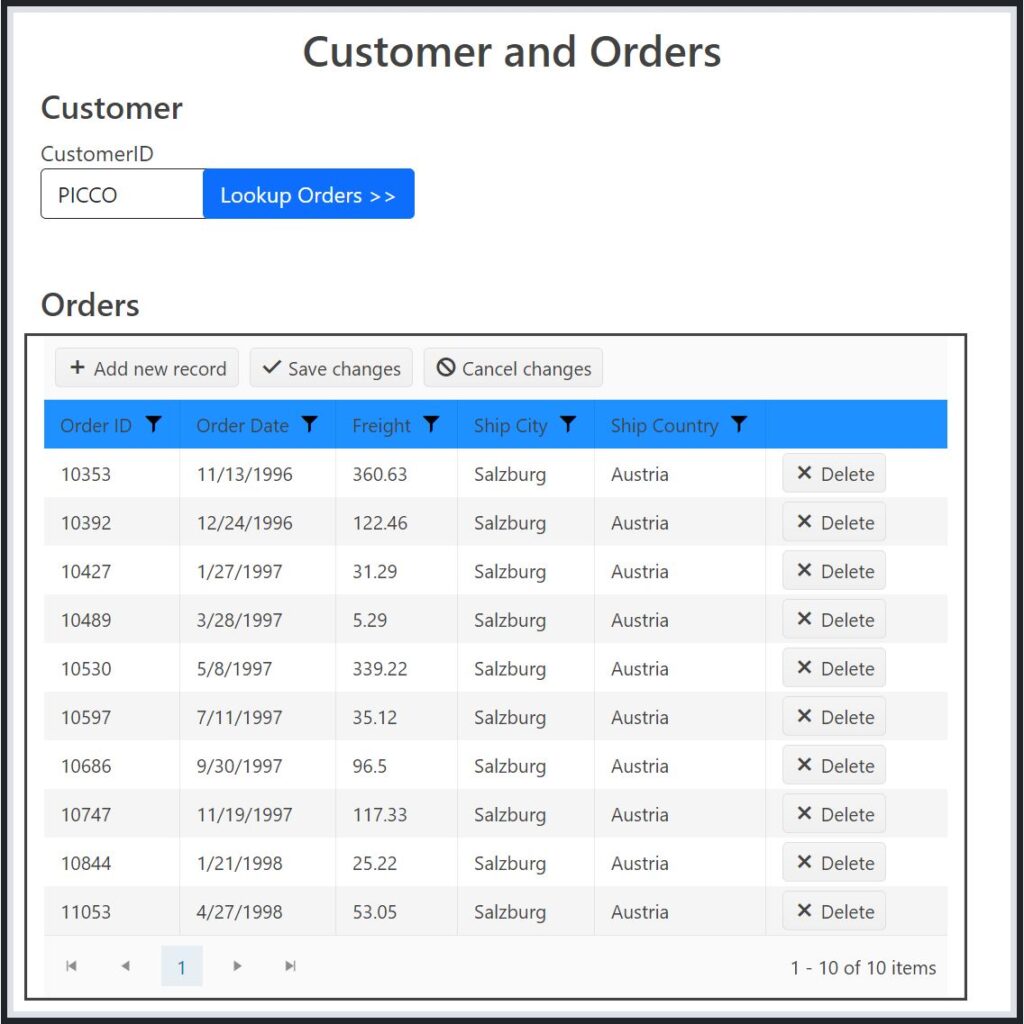
This customer has 10 existing orders. Let’s make make some changes here. We’ll add a couple of orders by clicking the "Add new record," we change the Freight in a couple of existing orders and we delete the last two orders using the Delete button associated with each order:
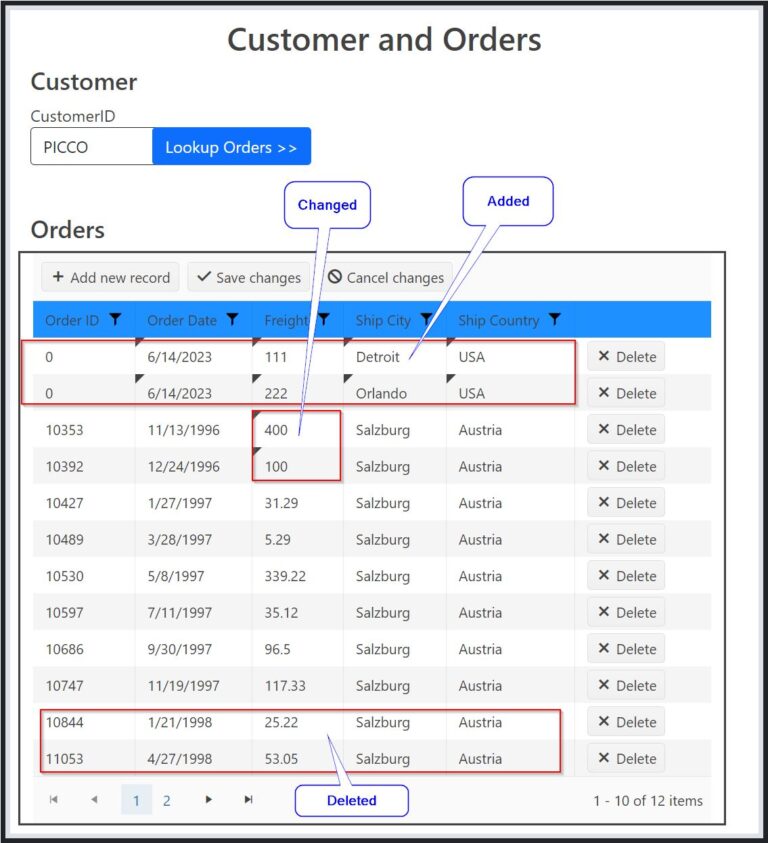
We click "Save changes".
If you set a breakpoint in each handler in the controller, you will witness how the handlers run asynchronously. Below is the view after we save the changes and the grid reloads --
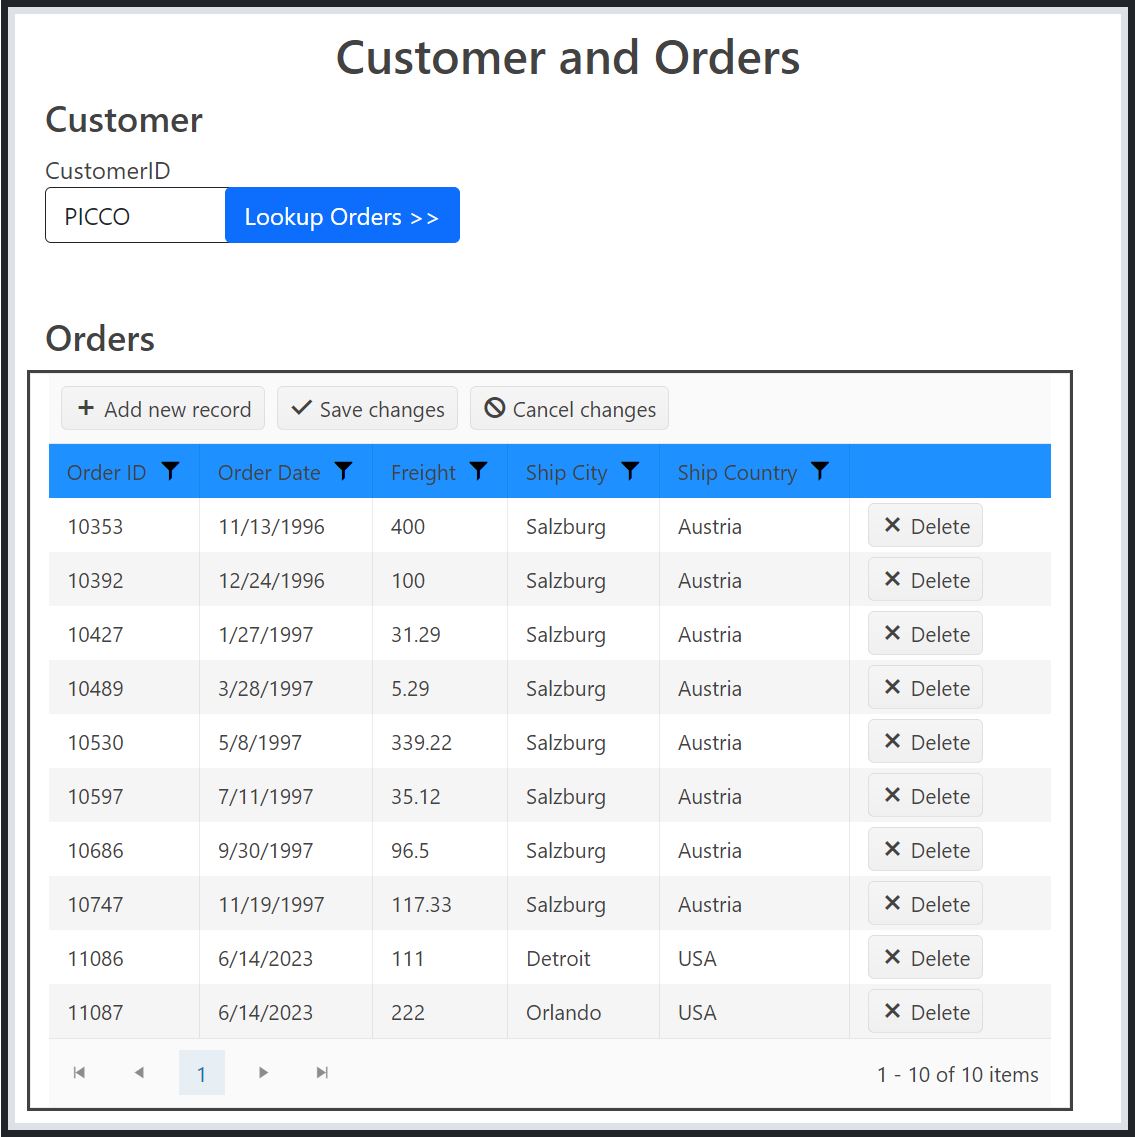
It's worth noting here that the grid's "Save changes" button does not cause a complete view post; the postback Edit method in the controller won't get called when pressing save.
Summary
Kendo grid offers easy out-of-the-box built-in buttons and handlers to perform CRUD operations on multiple records then committing those changes in one shot. Fine and dandy until we want other fields on the view that also require saving. The grid won't send its rows when the entire page is submitted, so custom coding is needed to send the grid rows to the controller on the server. In the next article I demonstrate how to do that...
Get the full source code
Clone the repo to run this Kendo Grid batch-mode demo locally.
git clone https://github.com/KLDFarhat/CustomersOrdersMvcBatch.git